A DNA test changes things. It inserts a surgical instrument into the flesh and blood of family and creates cuts and sutures at the same time.
It gives you answers… but sometimes answers only lead to more questions.
A DNA test changes things. It inserts a surgical instrument into the flesh and blood of family and creates cuts and sutures at the same time.
It gives you answers… but sometimes answers only lead to more questions.
Isn’t it always the way?
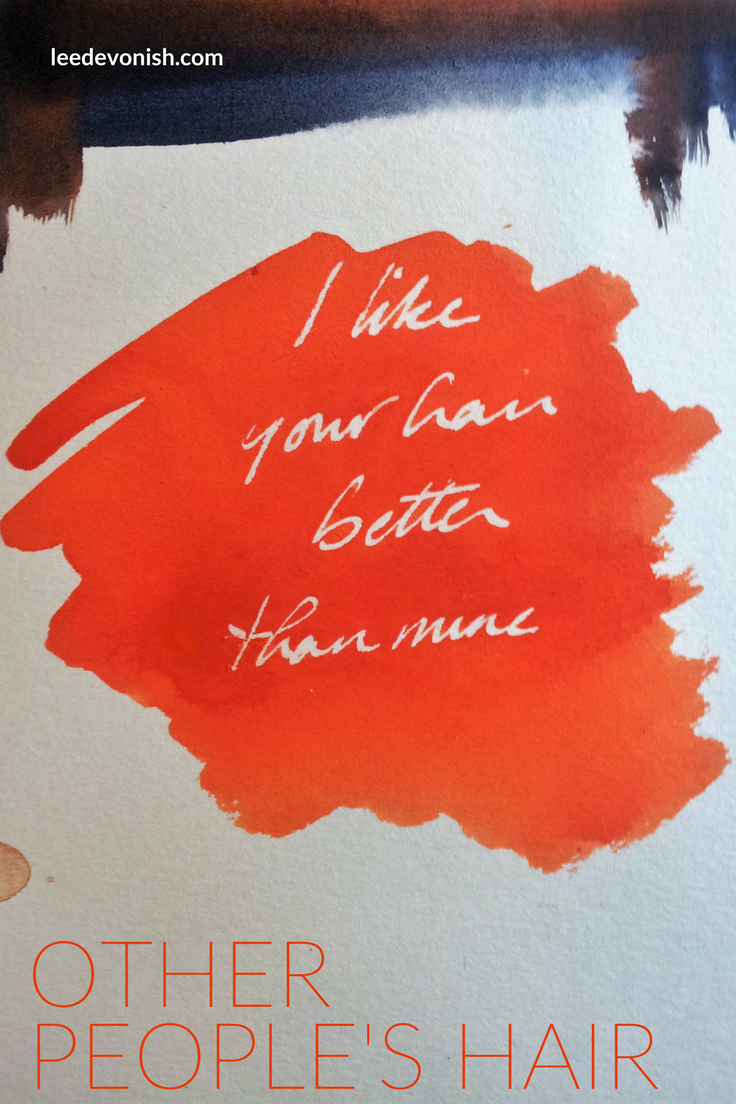
What’s the weird compulsion to straighten our hair when it’s curly, or curl it when it’s straight?
A lot of the time we’re fighting against our genetic nature: striving to differentiate ourselves from our immediate peers. We put on a style to describe who we are and what we are, or at least what we want to be.

Life gets much easier when we just accept what grows out of our heads (or what doesn’t), and make the most of that.
Maybe I used to once… but I’ve grown out of it, and my hair’s grown out too.
How does your hair shape your identity and community? Read “Roots And Culture” for more.
For all of the talk of my missing grandfather, you might have formed the impression that my grandmother’s side of the family was an open book. It isn’t.
For years, we believed my eldest aunt’s story about the identity of the white man who got my grandmother pregnant.
Joycelyn was the eldest of my grandmother’s two daughters, and although she was only twelve years old at the time, she was more reliable than anyone else who had given us information. However, no one else had any information for us, so my mother had no choice but to believe.
As artists or writers, we are taught conventions and traditions of thought and practice. In fact, I should go back to the start – as human beings, we’re taught to follow conventions and traditions.
People work well with established routes towards fixed outcomes because they’re efficient and they make us feel safe. Clichés, stereotypes, tropes, archetypes, whatever – the repetition of a recipe is attractive because we know what we’re likely to get before we start, and we don’t like to fail.
Fair enough.
There are many benefits to be had from learning the rules and why they’re there; in fact, I’m a firm believer in knowing the ins and outs of your craft in order to be able to know the best way to break the rules to get the results you want.
I speak and write Bajan whenever I like, with the firm knowledge that my spoken and written English is very good. I paint in a very traditional way because I enjoy the process and the meticulous frame of mind it puts me in. I know the rules and when to ignore or incorporate them.
My problem with traditions comes when they restrict thought, and even worse, rip you off.
For example, you can buy a party dress for a few pounds, but a wedding dress will set you back an awful lot, despite the fact that any dress you wear to your wedding is a wedding dress.
You can buy materials from a hardware store and knock up a “masterpiece” (another term redolent of unhelpful tradition, but that’s another story), but you can get fleeced in an art supply store and come away with little more than a sense of belonging in the club. That’s not to say that there aren’t many specialised artists’ materials that are worth their price, but too often there’s more than a hefty premium for the right branding.
How many products can you think of that have nothing to do with art, but bear the name of a famous artist? How often have you seen the Italian Renaissance referenced in aid of entirely inappropriate clobber, or French impressionists plastered across incongruous tat? Start in the museum or gallery shop, and end in the second hand car dealership.
The trouble with tradition is the appropriation of cultural highlights for commercial gain.
I found a masterpiece in the loo at work, for example. Duchamp was not the artist being referenced.
Traditions are like a cozy duvet, but most of us who are able aim to get out of bed at some point during the day.
Personally, I don’t understand the appeal of doing things you don’t like and being with people you don’t like in places you don’t like because it’s traditional – that’s just doing things to keep dead people happy. Really, being overly dependent on received methods of working, thinking and acting is a sure way to be restricted, unhappy and broke.
I enjoy art and writing that understands its place in history, its influences and its roots. This doesn’t mean it has to be a pastiche; on the contrary, knowing where you’re starting from can help you to define where you want to land.
Says she who makes oil paintings.