Posted in Studio Notes

Studio Notes: block printing & casting ingots

I finally made prints from the block I carved, but I haven’t yet shown them as a finished edition for sale. So this is a bit of a quick preview!

Edit – find the prints here.

Block printing for the first time in the studio

A friend of mine was getting rid of a desk, so I pinched it to give me a separate surface that would be perfect for cracking on with the printing. It was great, but I still covered all of the available surface and ran out of room. I just can’t work any smaller…

Hand rubbing with a baren

At first I really struggled to get a satisfactory print with my plastic baren, so I substituted the back of a stainless steel measuring cup. It worked fine, but what I didn’t expect was getting hot fingers from holding the inside of the cup as I rubbed it over the block!

Using a measuring cup as a baren.

As there was no room for stacking wet prints, I used some old skirt hangers that I’d been saving just for this purpose, along with some doubled-up space-saving hanger thingies.

Alternative drying rack
My version of a space-saving print drying rack.

Casting aluminium ingots

We got the furnace fired up again to melt more cans and make more ingots in readiness for casting our finished projects.

In all honesty, it was a bit of a pain not jumping straight into casting the end products, but I didn’t even have a finished prototype of my coin sculpture, so there was no point in rushing it.

Our first aluminium ingot
Our first aluminium ingot – we cast 5 during the second melt.

I sacrificed a donut-shaped muffin tin for the cause. It was worth it as I never seemed to get anything out of there in one piece anyway, and the ingots come out as cute mini metal rings!

Coming soon…

I’ve got a coin prototype that I’m almost happy with and some new coin prints to add to the store.  In between these projects I did a bit of graphite and charcoal drawing on canvas and played around with combining it with acrylic colour… so yeah, lots to share next time!


Studio Notes: Building A Bucket Foundry

Studio Notes: building a bucket foundry

This week in the studio we started a long-awaited project: building a charcoal-fired backyard foundry in a bucket. Now, most of my projects carry on over several weeks, if not longer, but this project is definitely not a one-week wonder.

I think there will be several more weeks of updates as we refine and add to it, but this week we made a start of buying and scavenging all of the pieces, putting them all together and testing it out.

For the fuel, we used regular lumpwood charcoal, bought from the pound store for £1 per bag, of course.
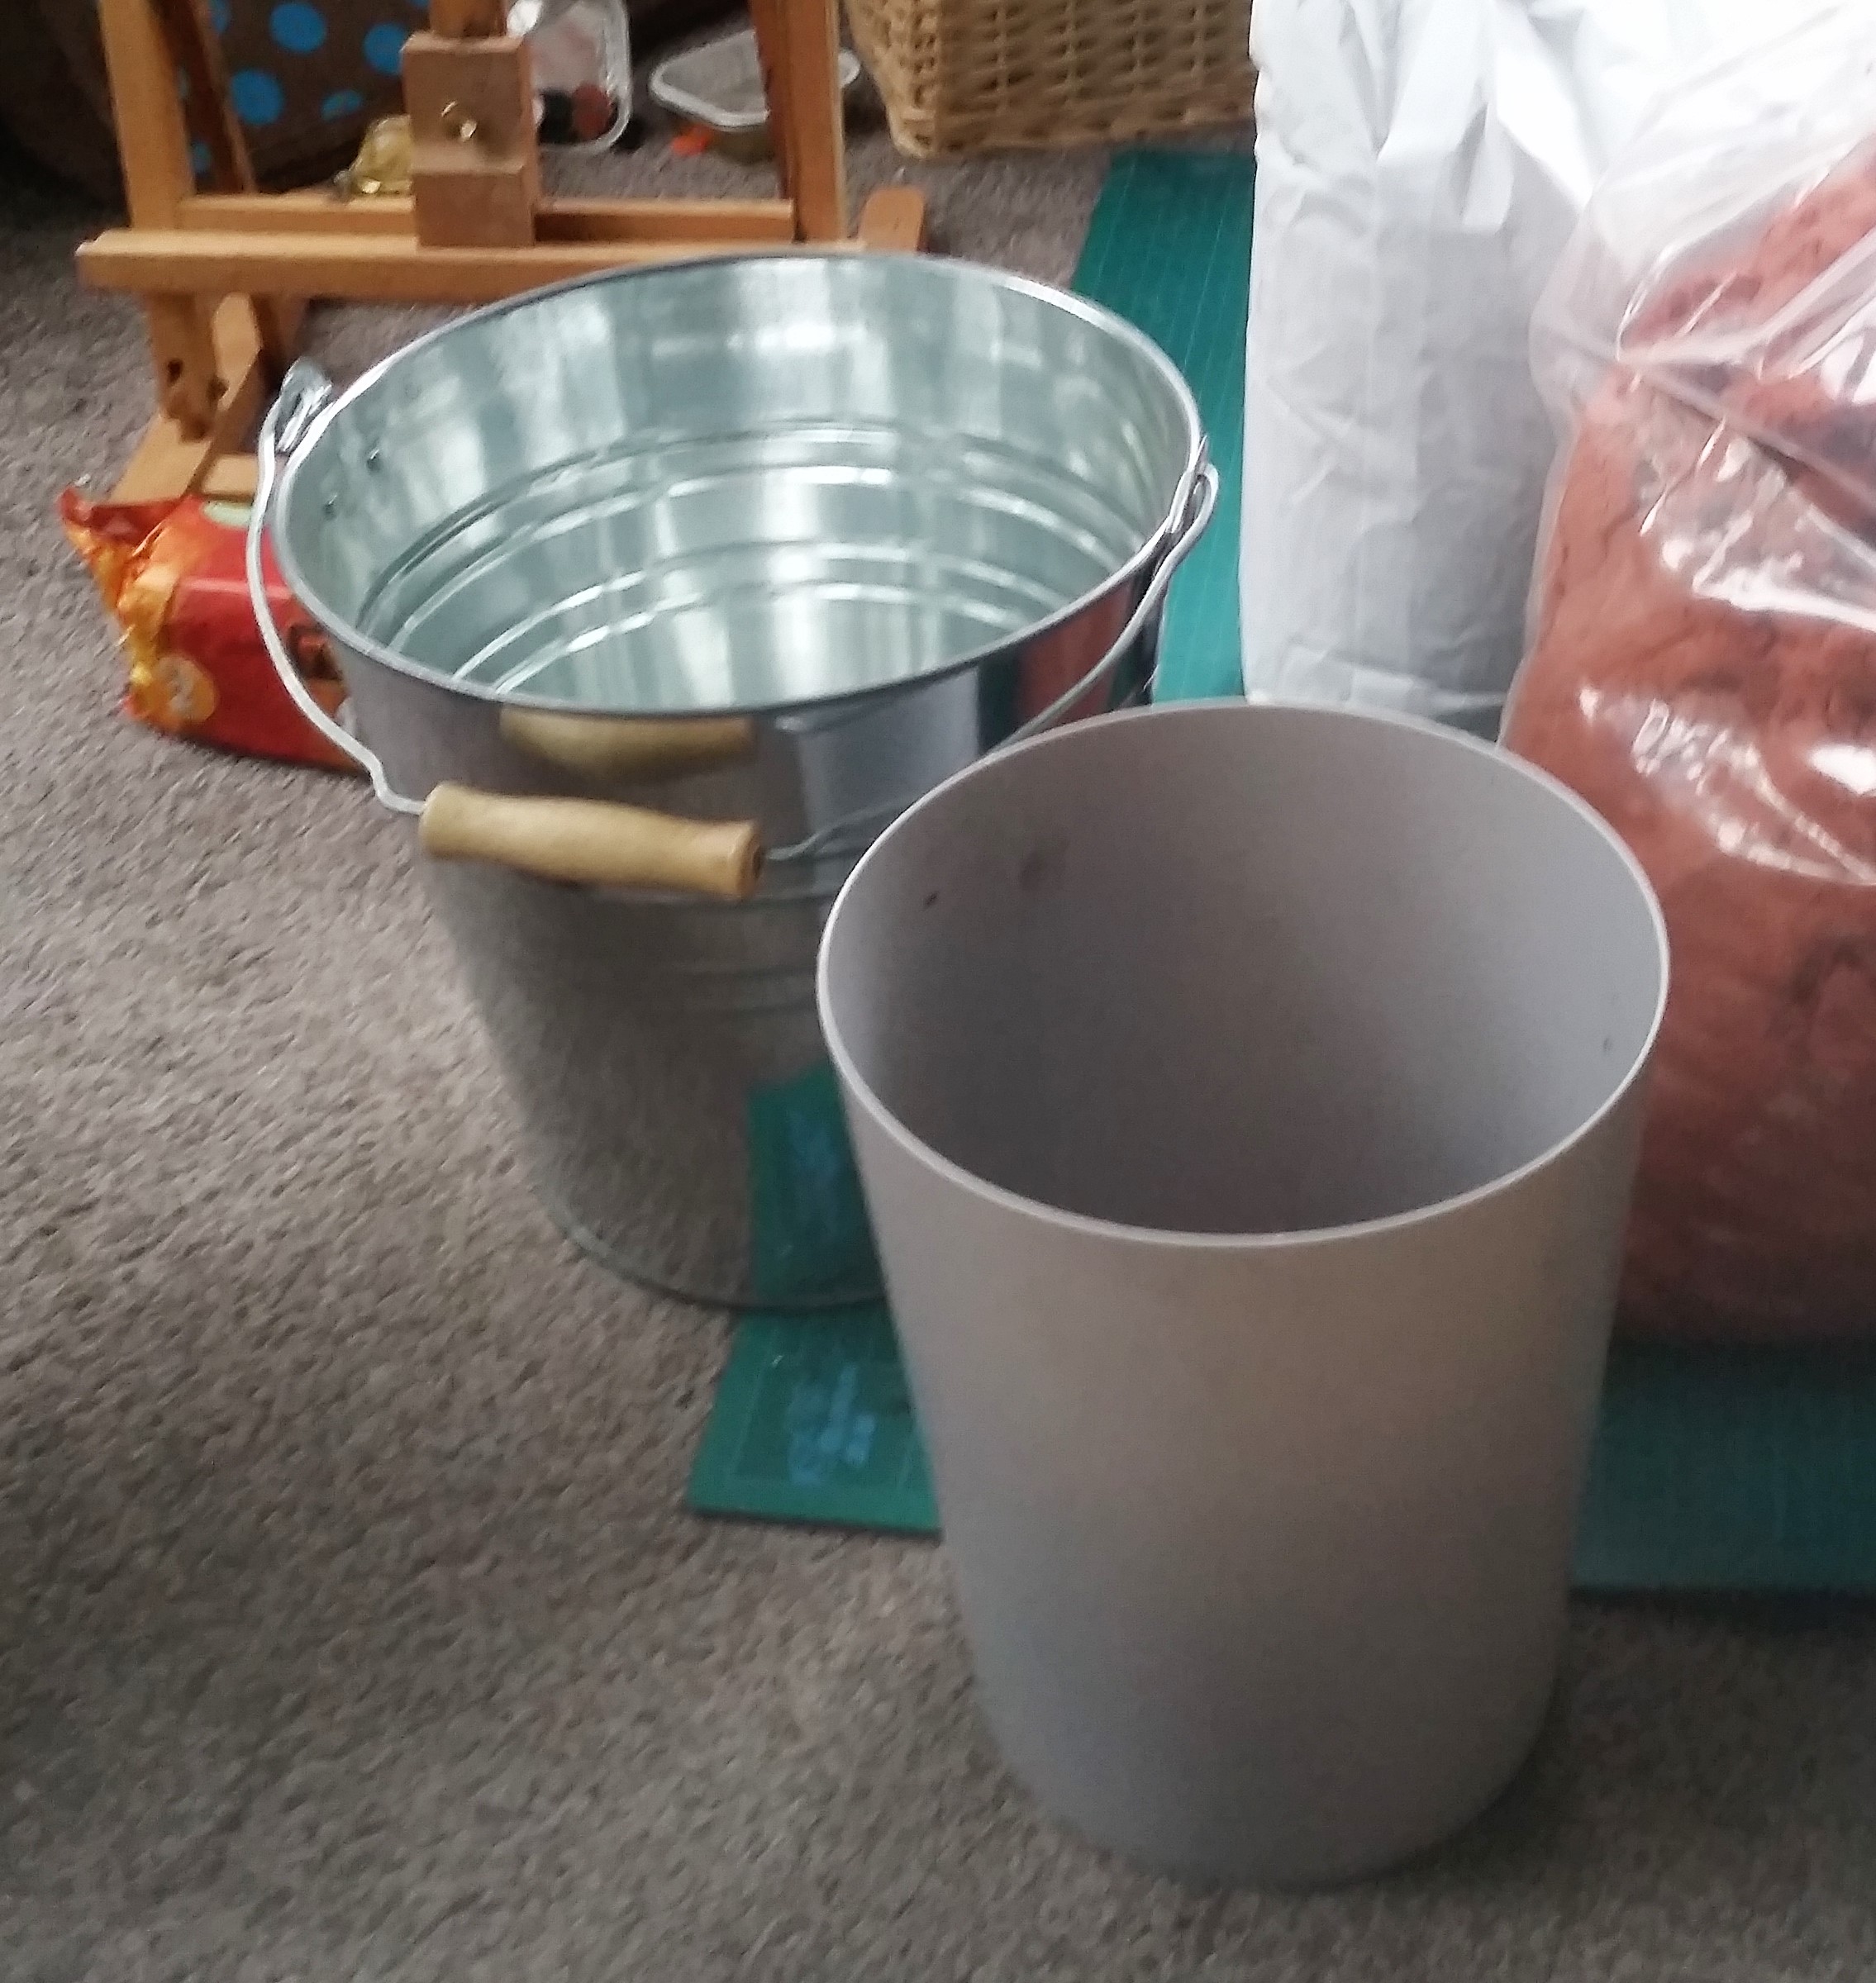
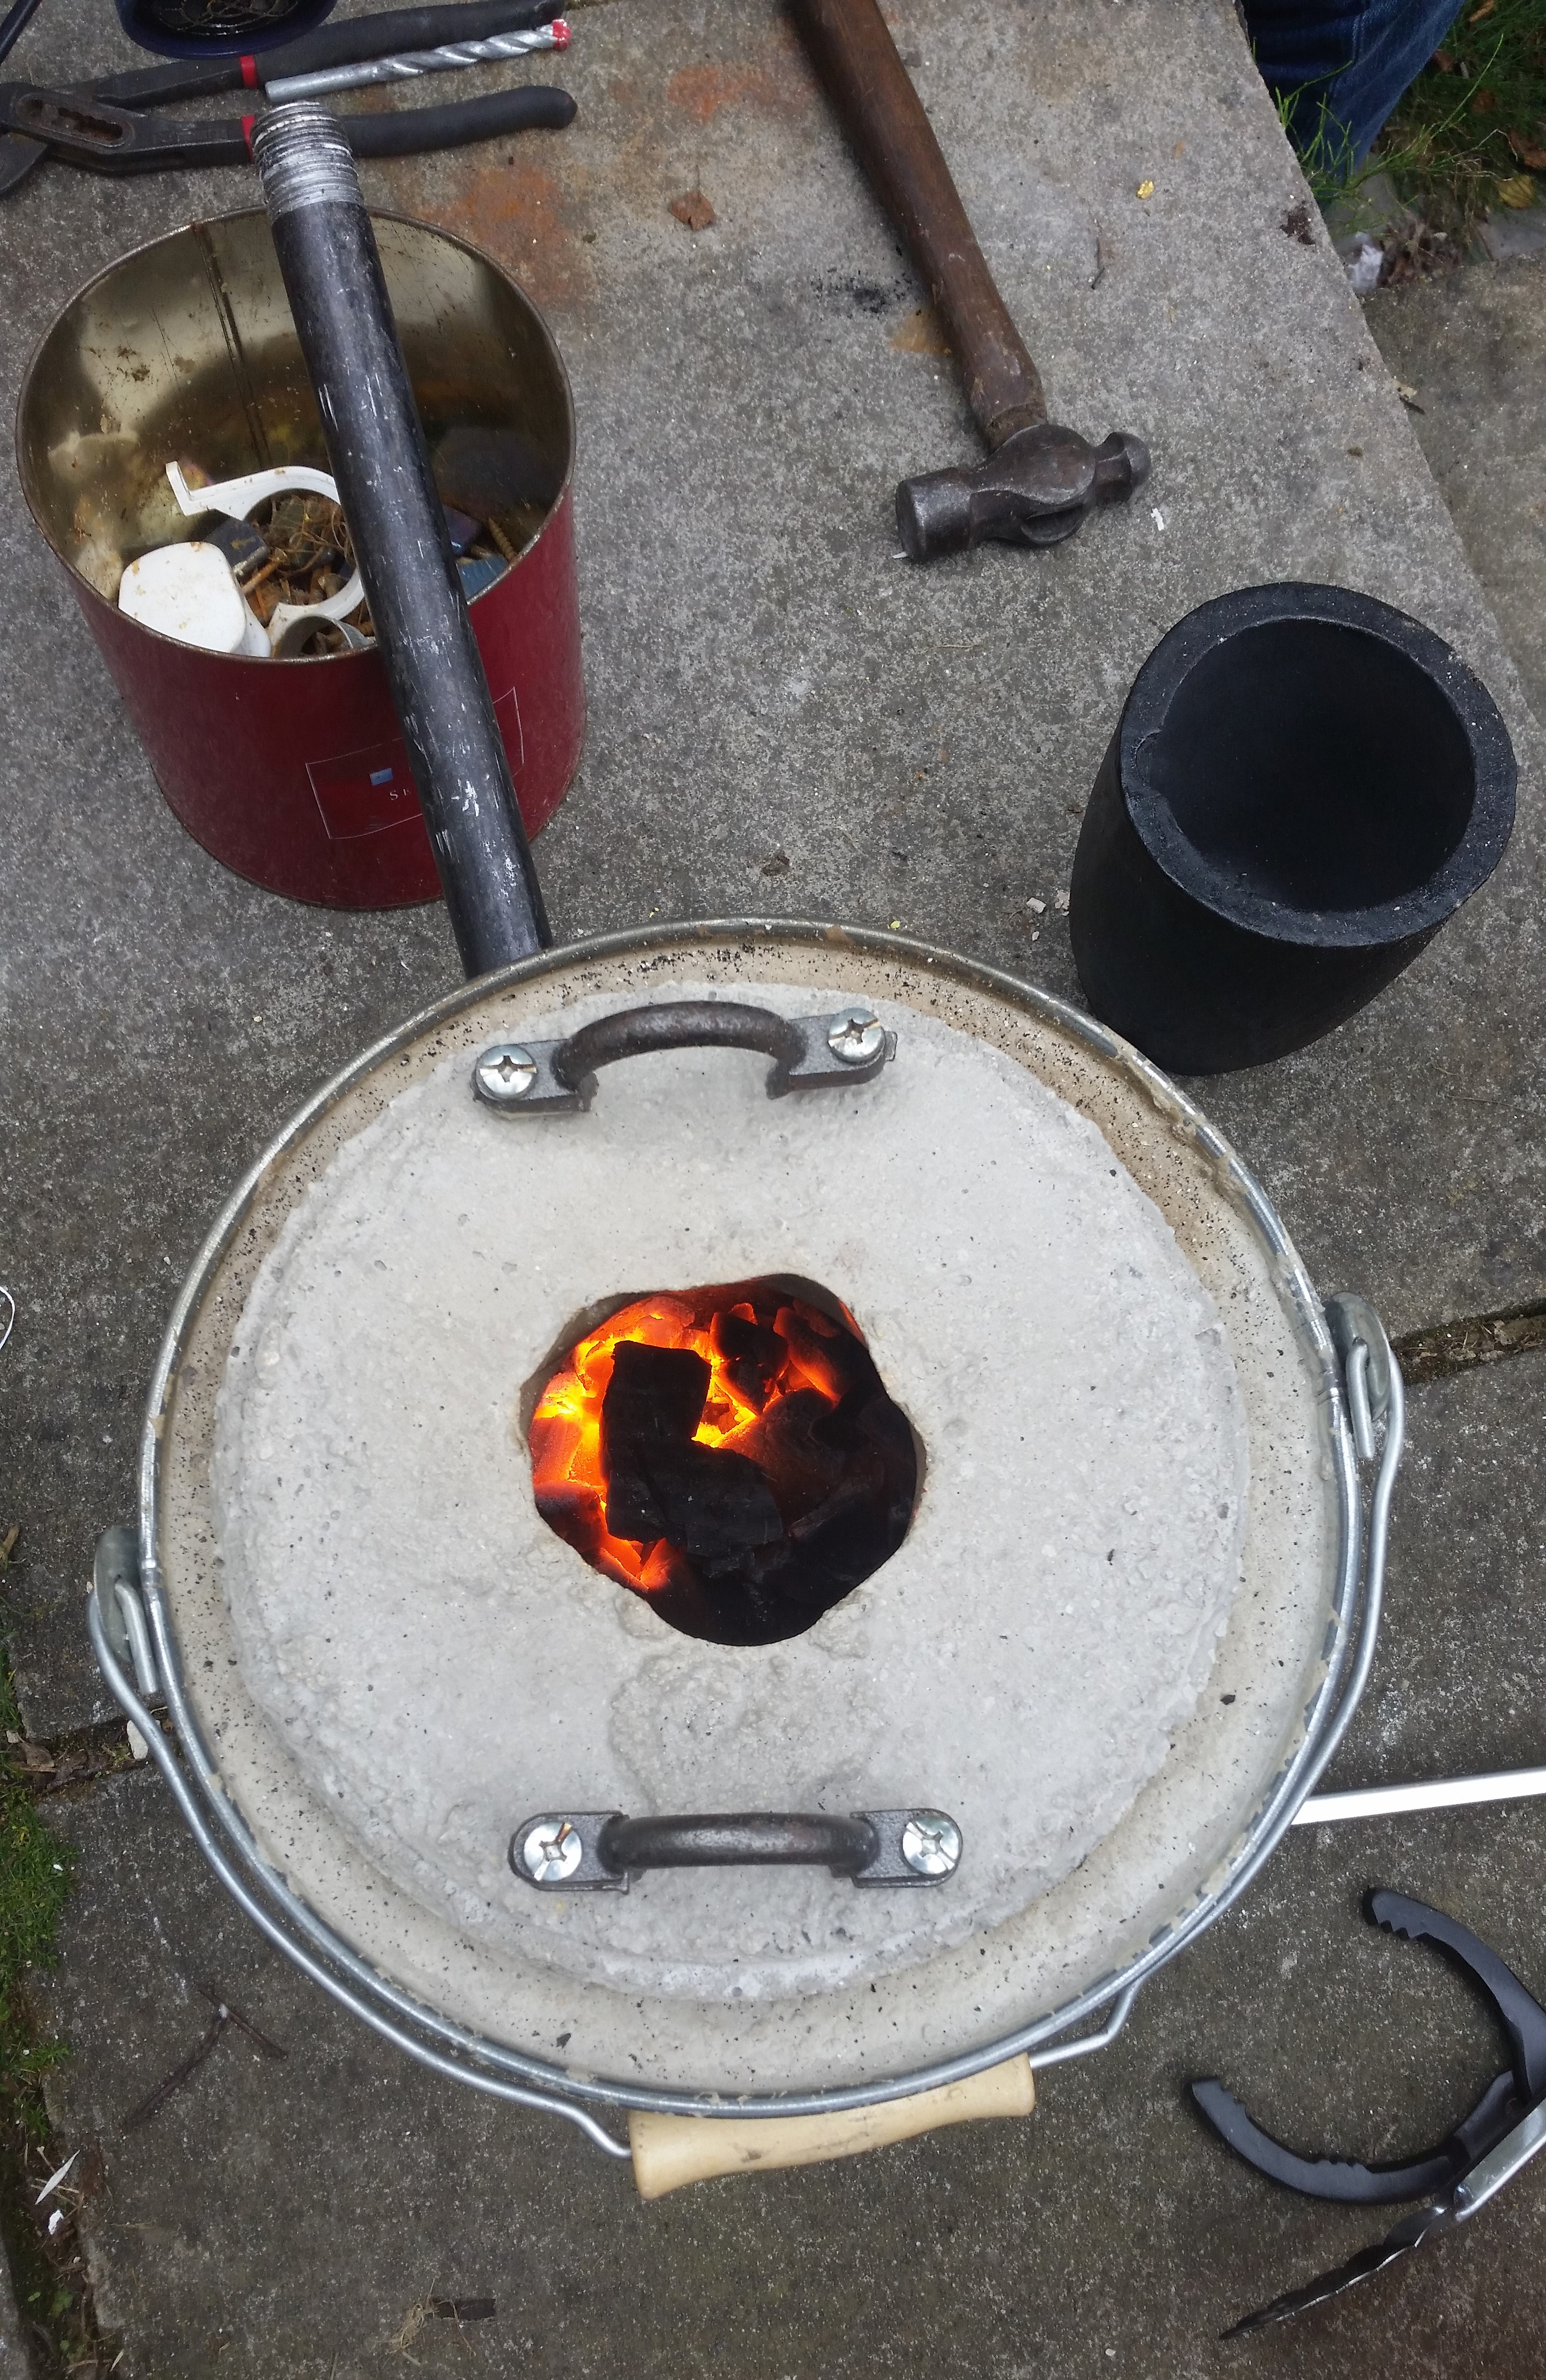
The galvanised steel bucket and old wastepaper bin we used to form the cast.

The bucket

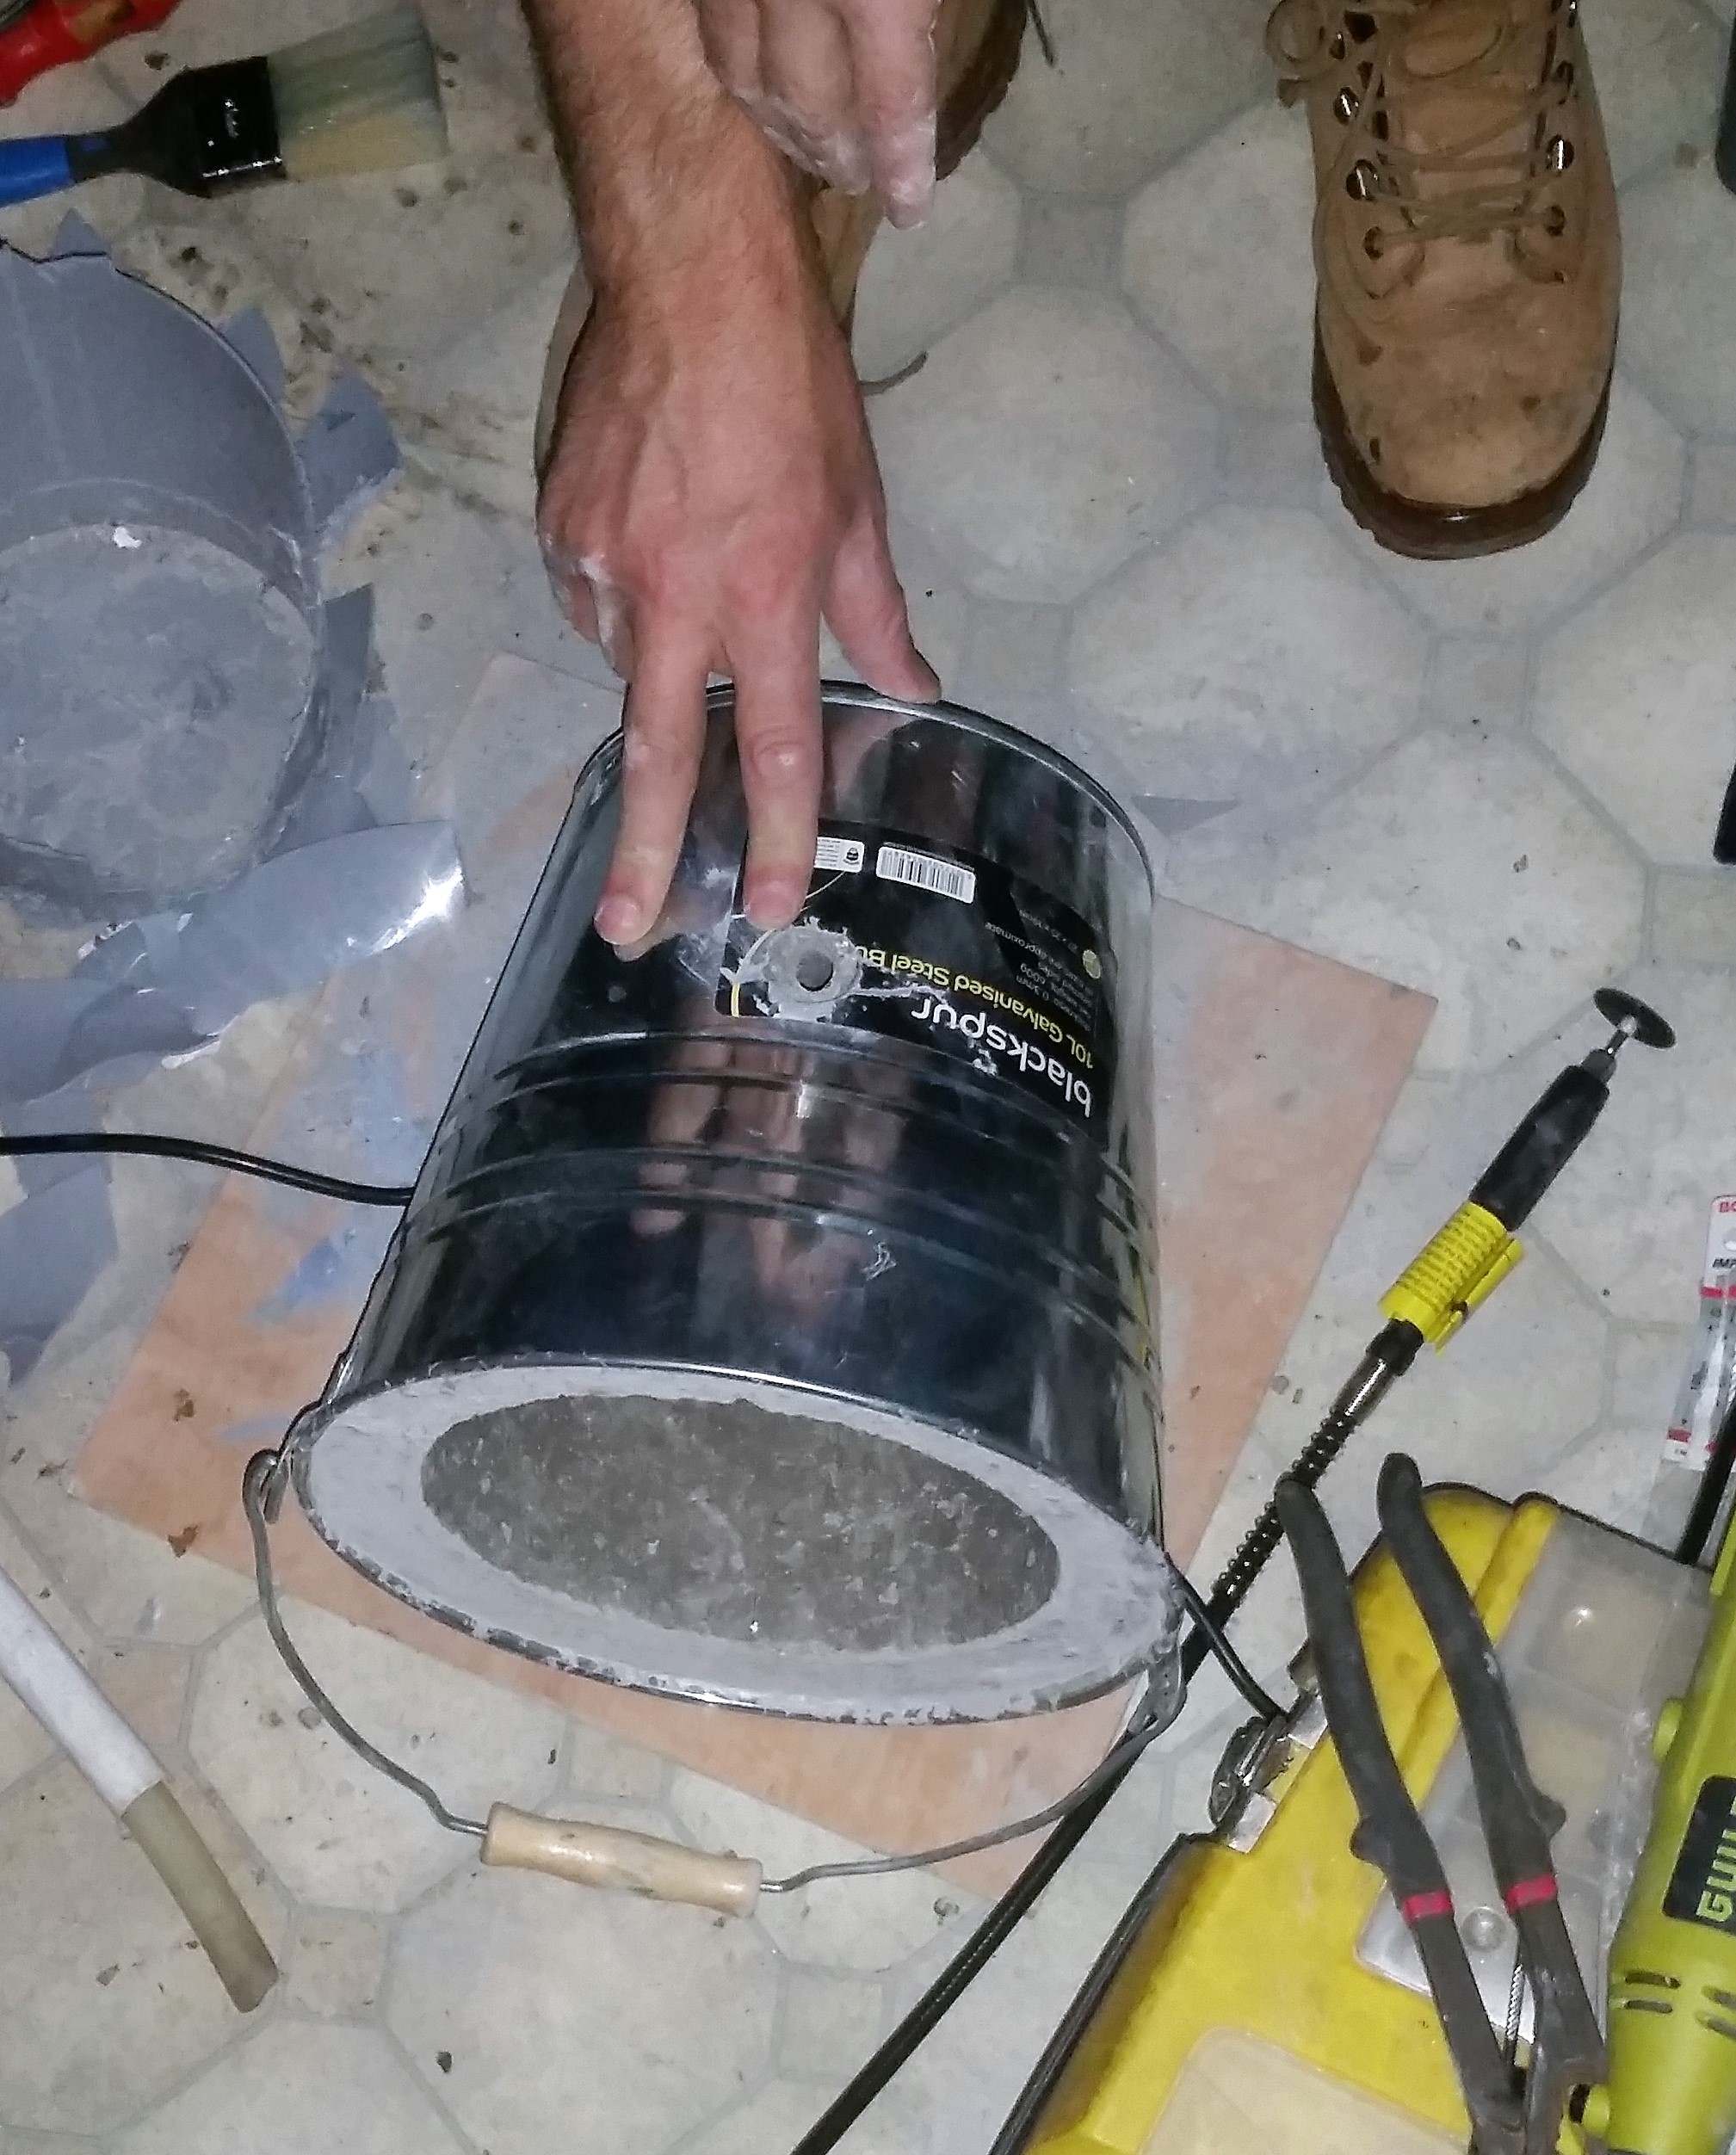
We picked up a galvanised steel bucket (like this one) and small plastic paint kettle from The Range in order to cast our refractory cement and form the body of the forge.

The refractory cement we used came in a 25kg bag, and we got it from a local foundry supplies merchant. (I know, what are the chances of having one in my neighbourhood, right?) They also sold us a huge bag of oil bonded sand and a graphite clay crucible.
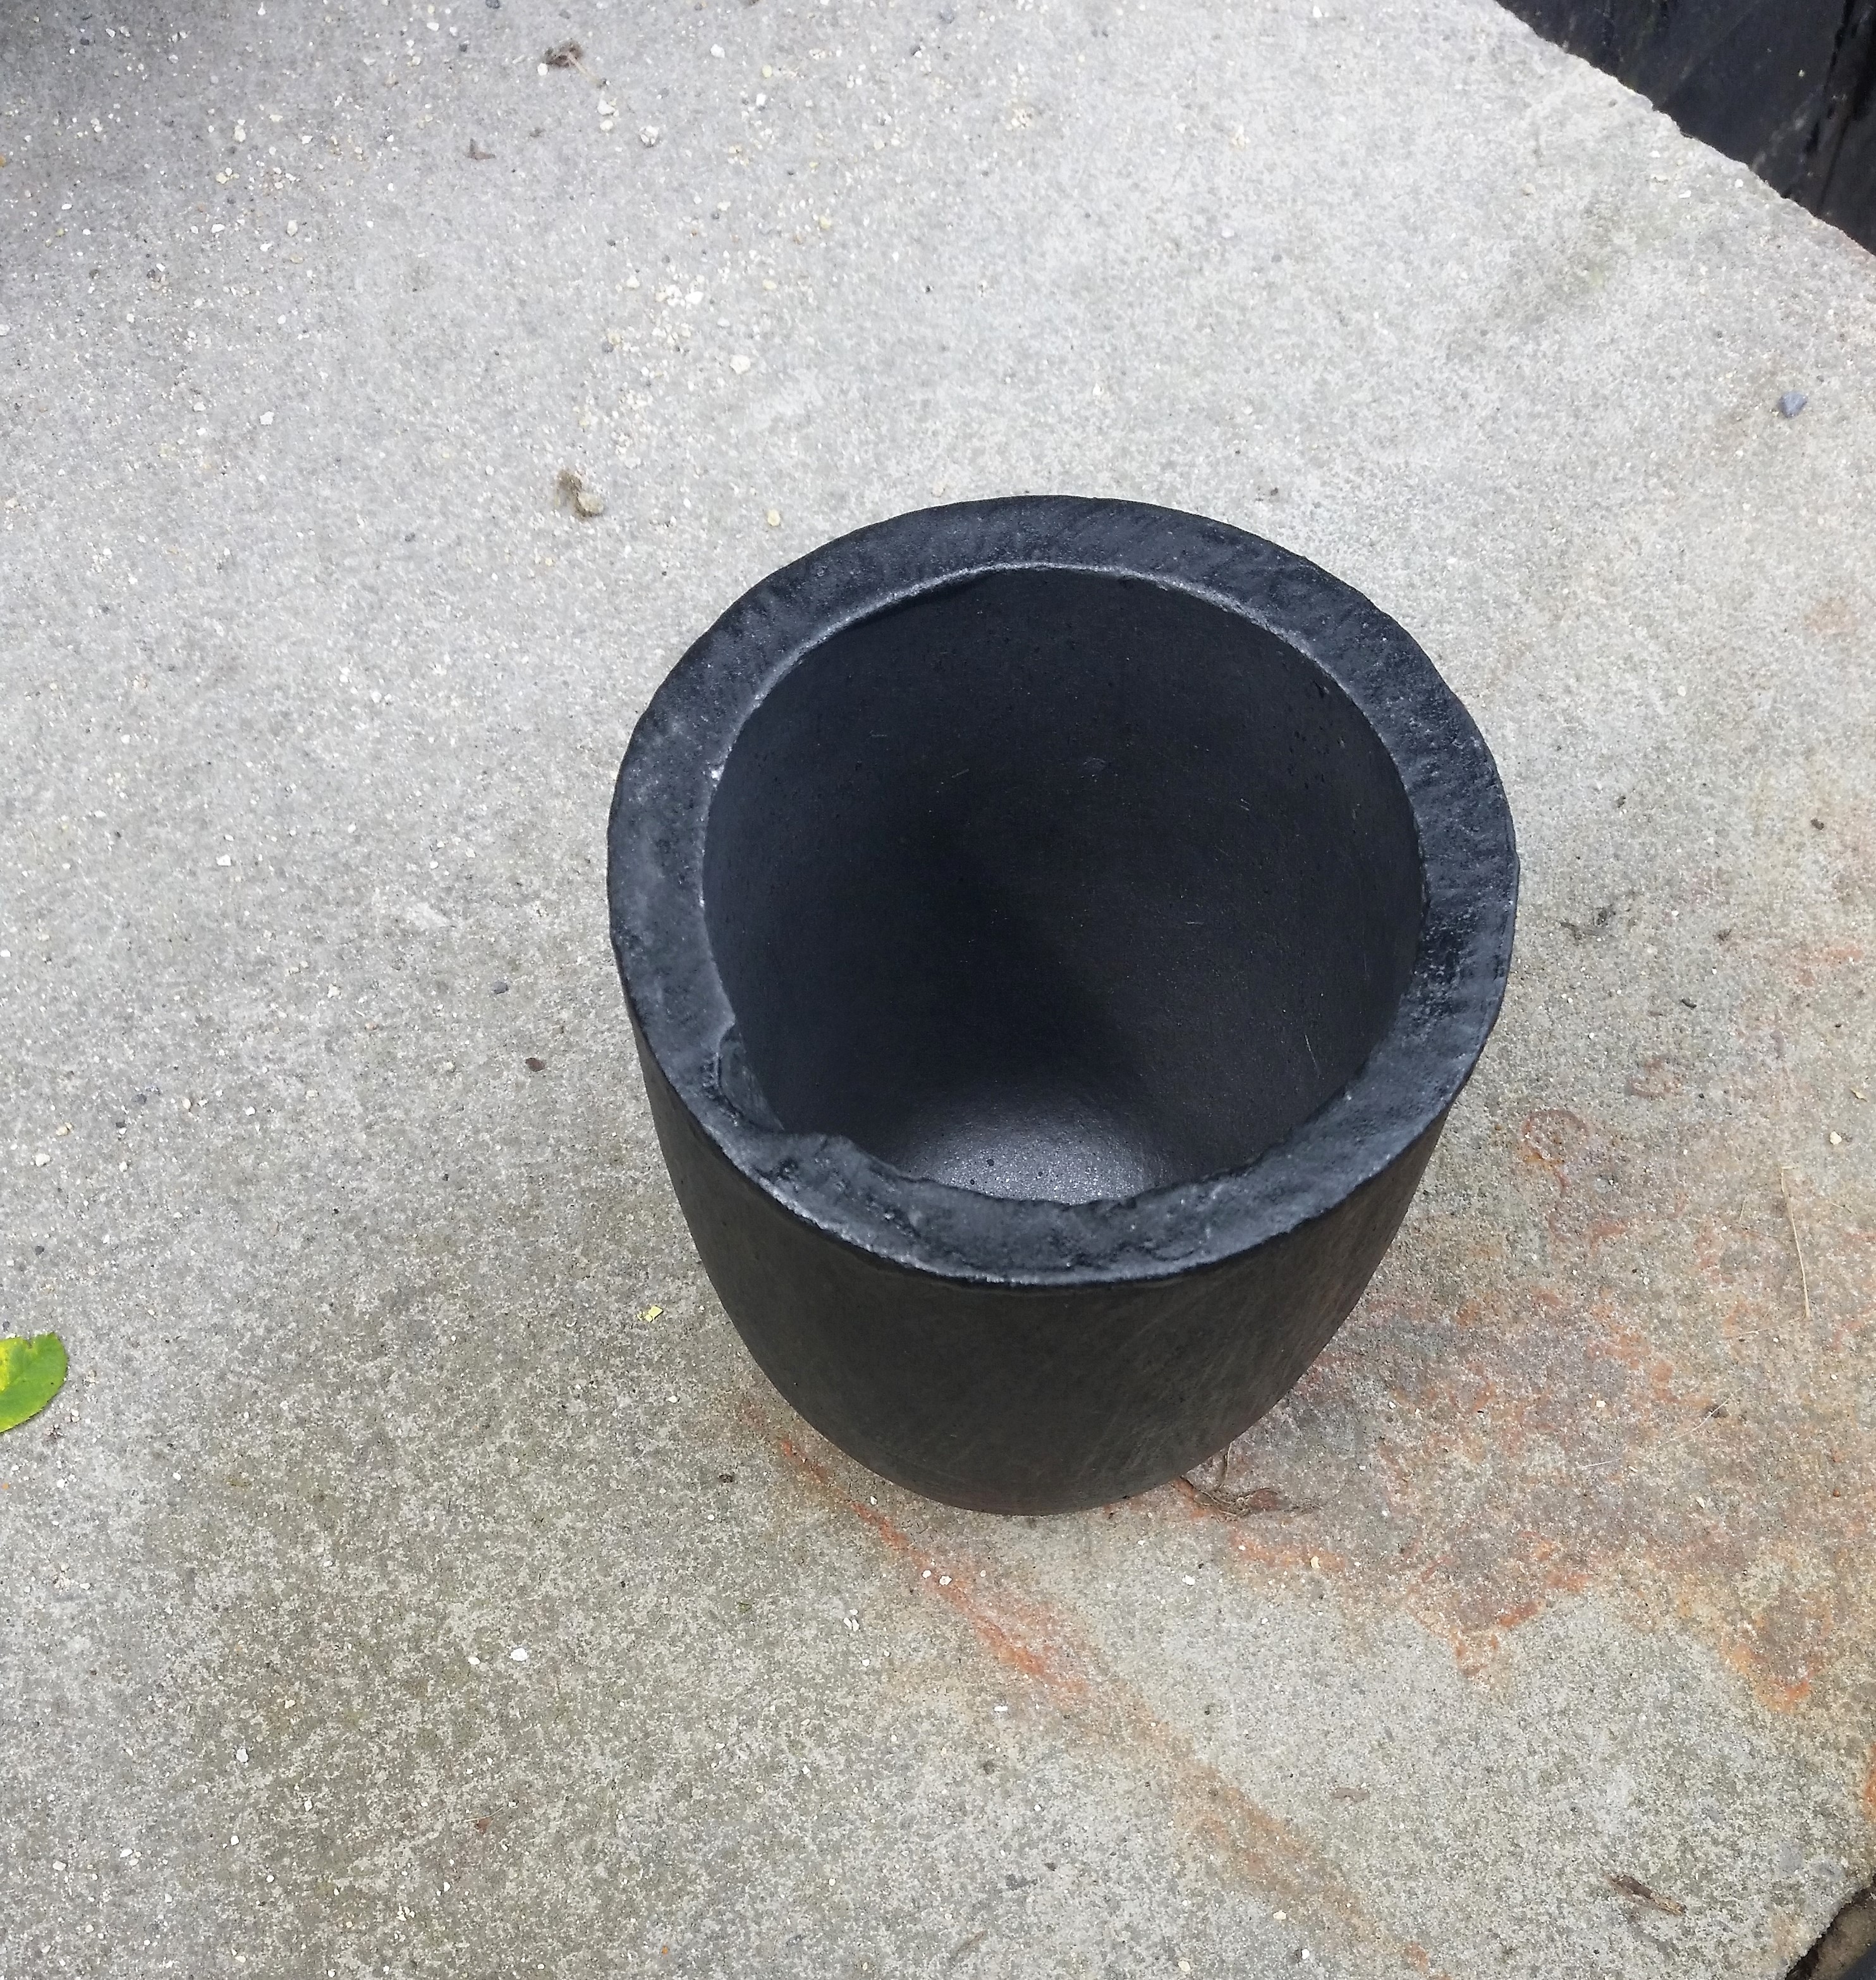
The crucible

The crucible itself cost £30… we were happy to get a decent one and not attempt to DIY it from some salvaged steel, as we plan to do it properly (as properly as can be done in a bucket) and don’t like the idea of a crucible failing.

Studio Notes Silicone Moulding & Woodcuts

The lid

We made a lid for the foundry by pouring some of the cement into a circular frame and embedding some scavenged handles into it. A bit of extra cement went into a plastic food container and made a handy slab that we used to cover the lid entirely.

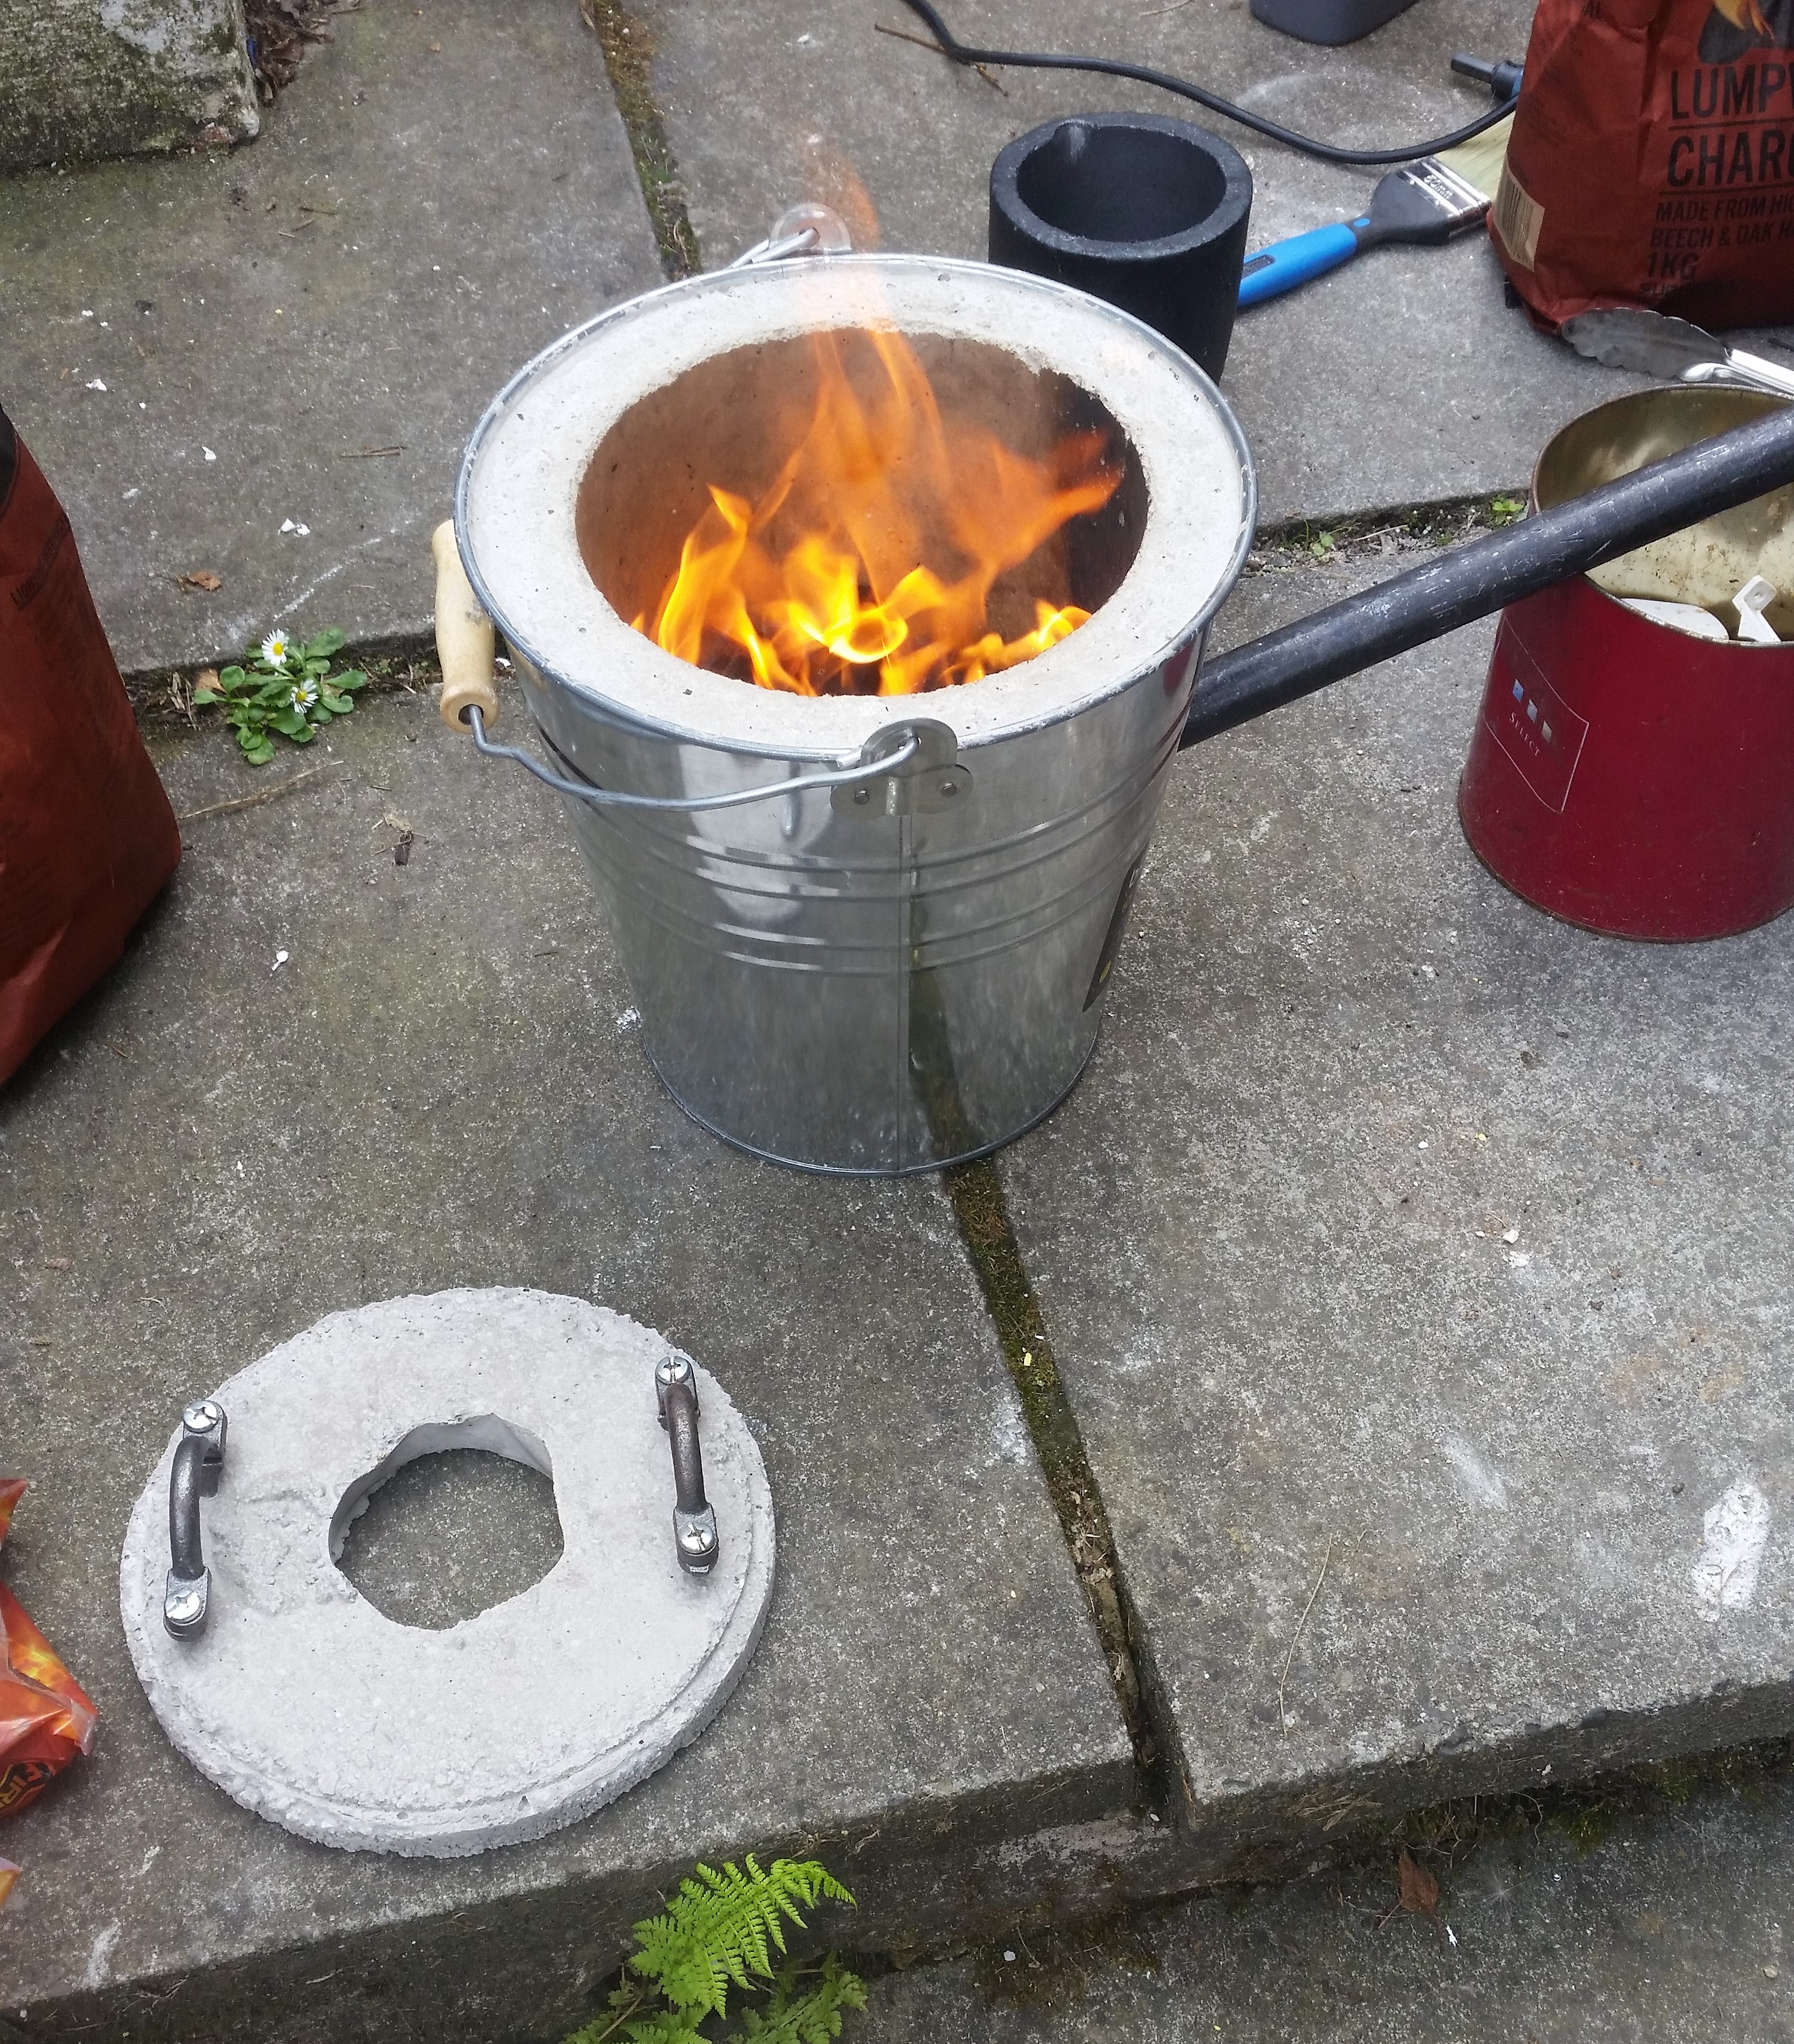
The central hole was made by placing a plastic cup onto the board before pouring the cement, but it crumpled under the weight and left a wibbly outline. It took a fair bit to fill the bucket, but there’s still plenty more left over for more projects – maybe a small kiln?

Studio Notes: Building a bucket foundry.
Drilling the air supply port after casting was a bit of a nightmare.

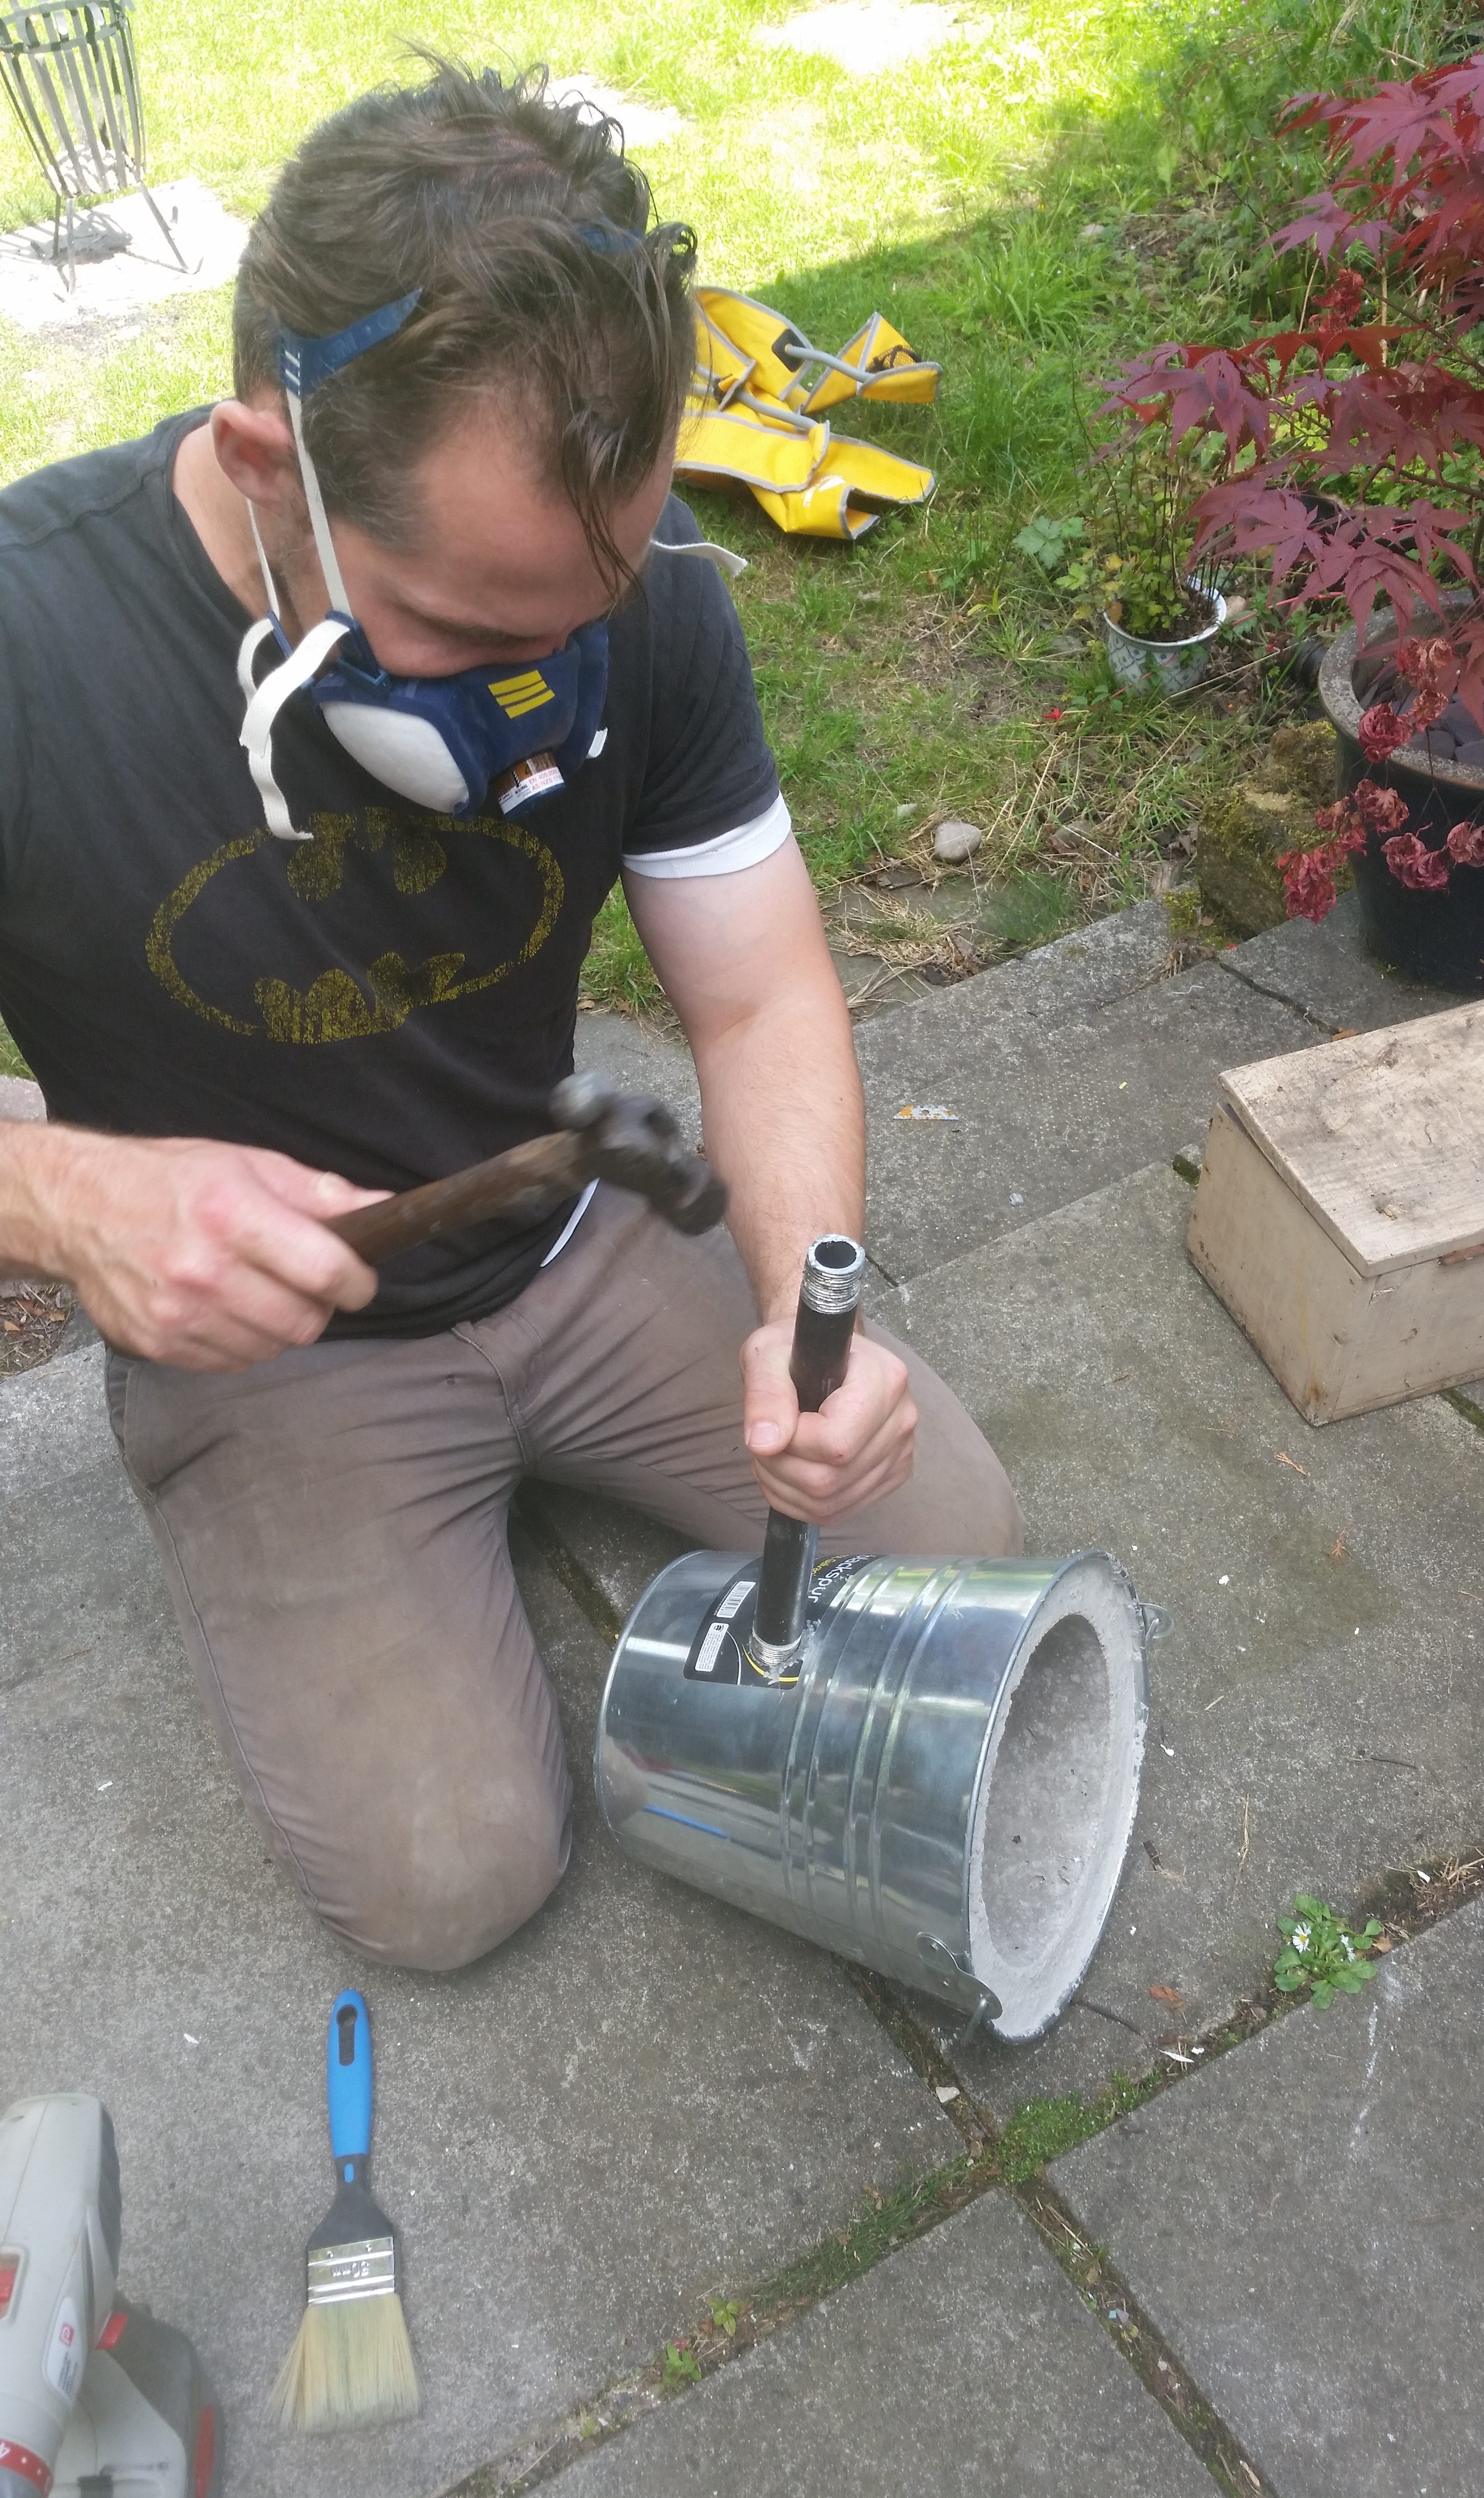
Powering the furnace with a hair dryer

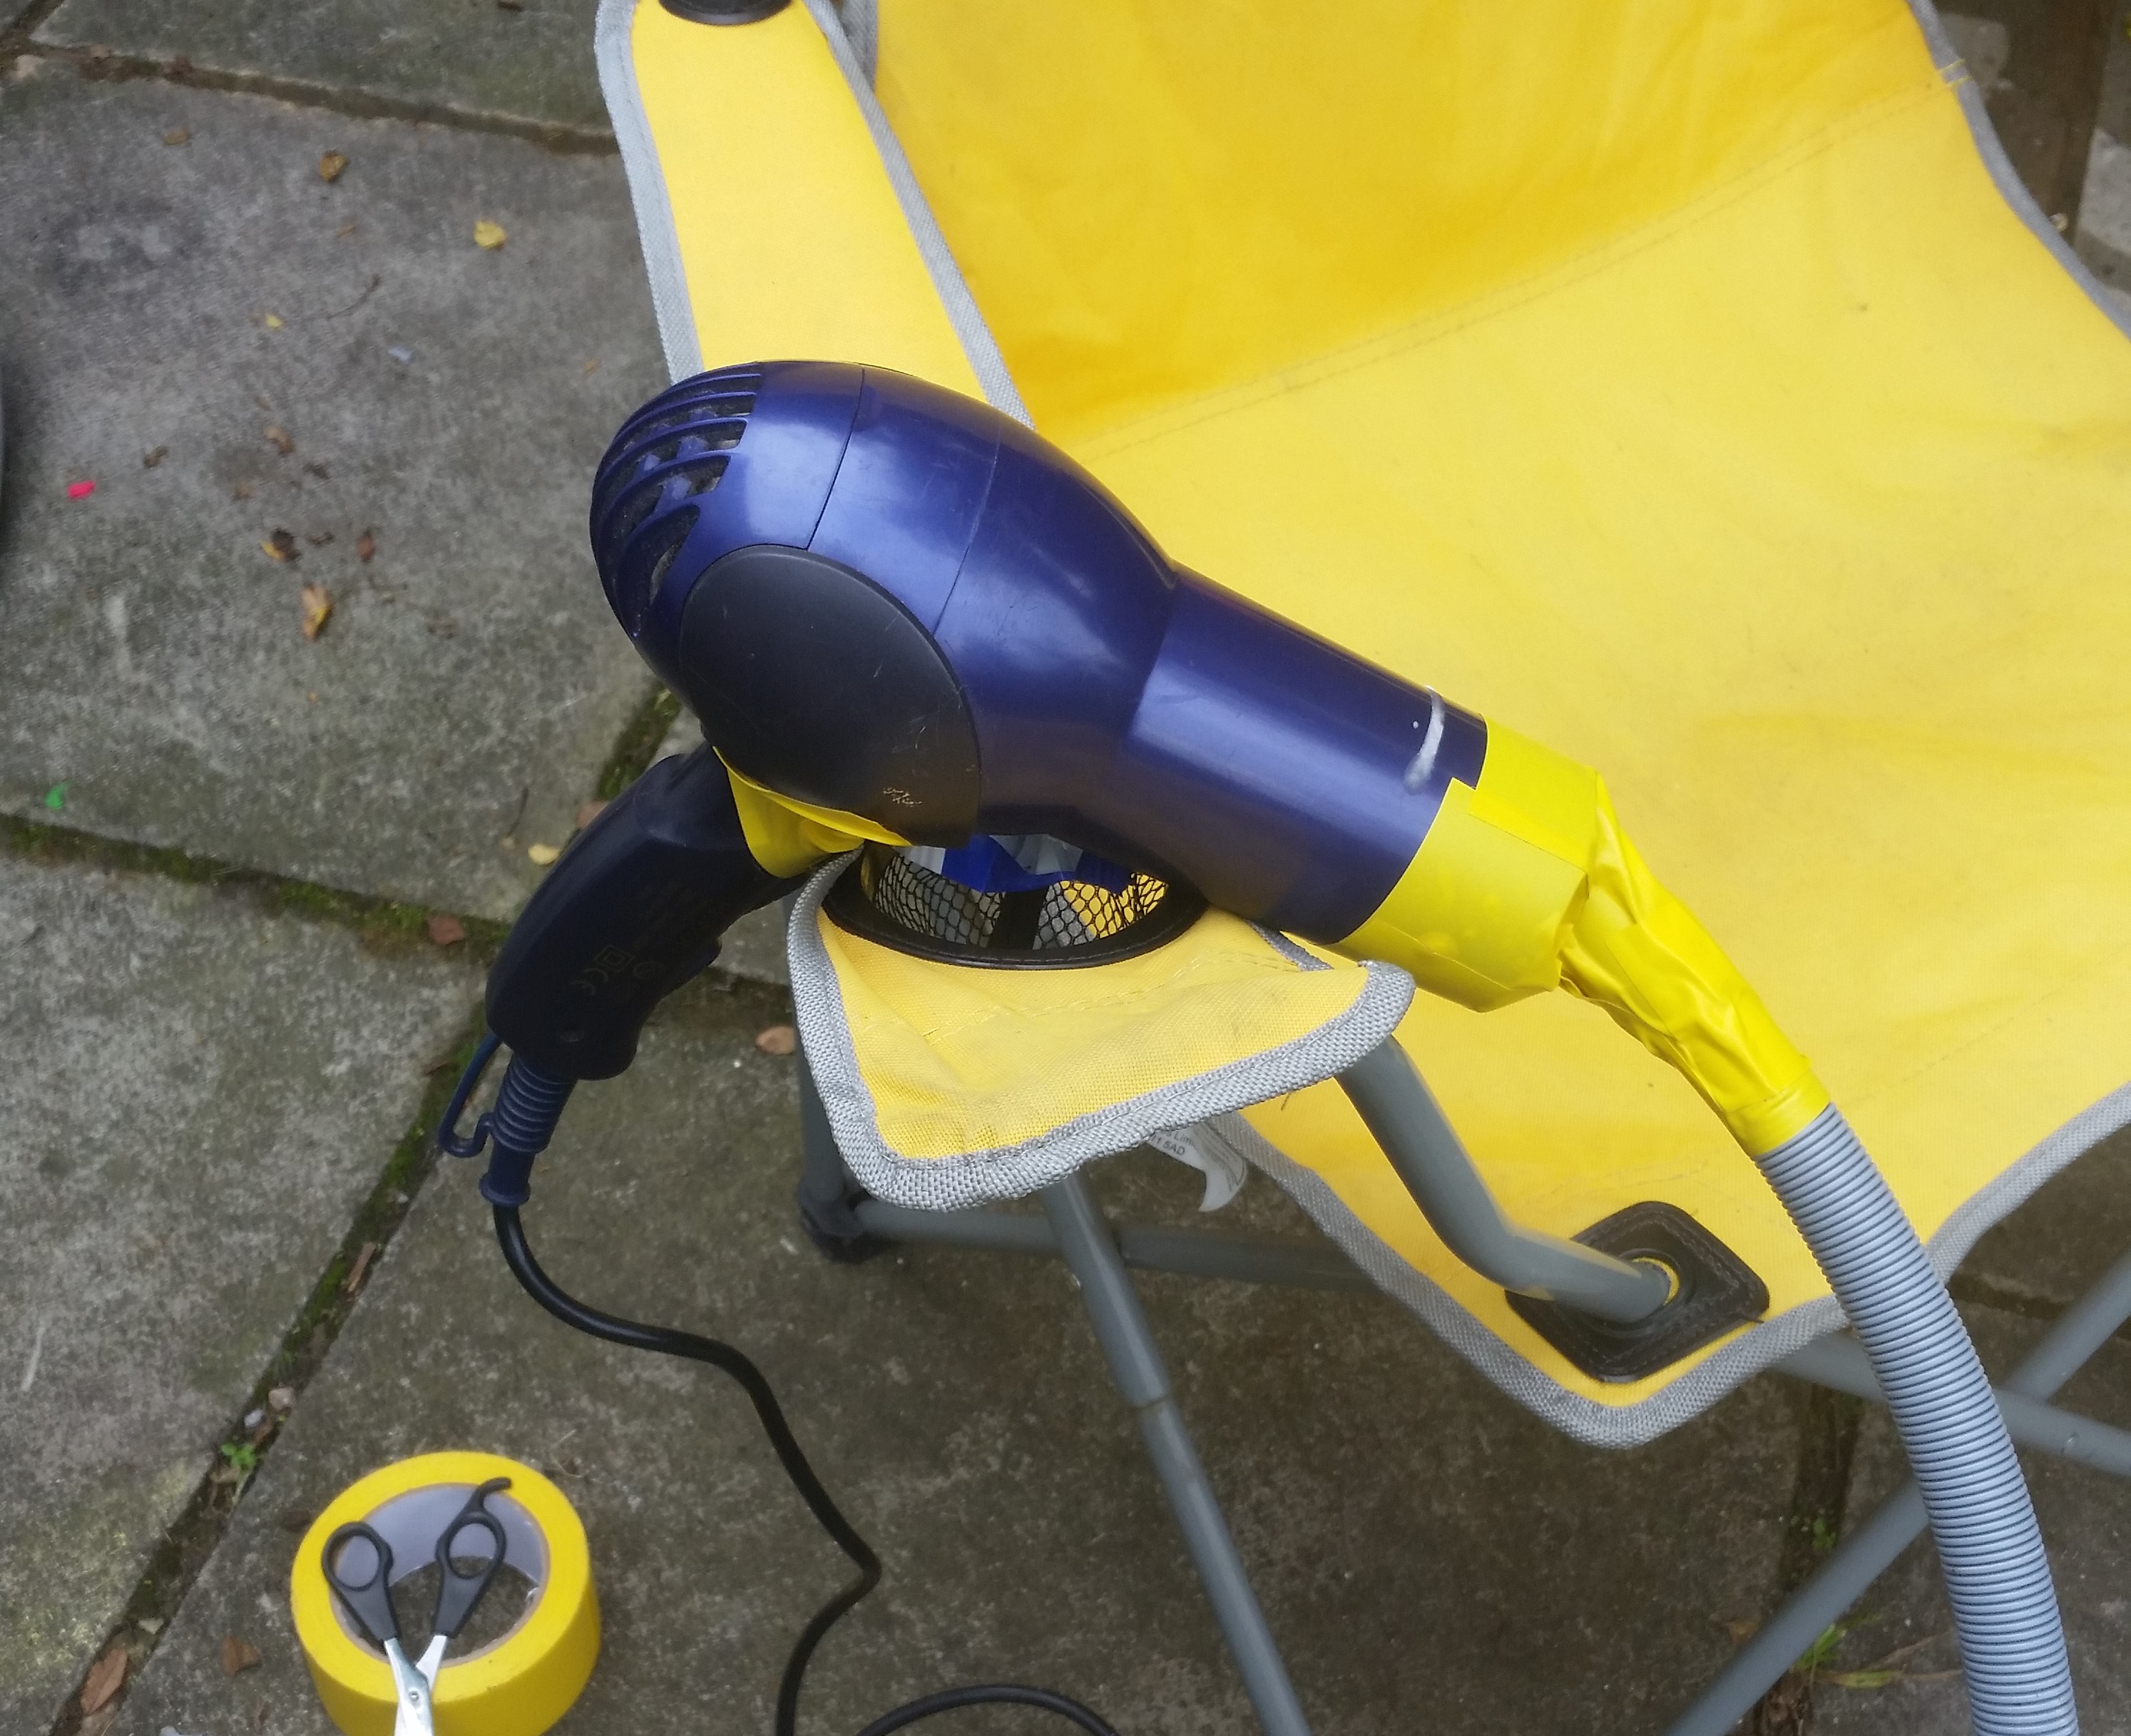
We were told (by YouTube) to connect up a hair dryer via a pipe and steel tubing to blow air into the furnace. The problem was, the hair dryer got too hot when taped to the pipe, even with holes cut into the tape.

Blowing air directly into the steel pipe worked, but it didn’t get very hot. It was only when we abandoned the pipe altogether and blew the hair dryer directly into the air port that we got the foundry hot enough to bring the crucible up to temperature.

First firing – tempering the crucible

Firing up the foundry for the first time was exciting, but we knew we weren’t going to start melting any aluminium straight away. We had to temper the crucible first – bring it up to glowing red hot and let it cool down again.

The heating process took a lot longer than we wanted it to, because, basically, we had to figure it out as we went along. The air supply issue was critical to the foundry heating adequately, and when we got the right amount of air blowing in thanks to the hair dryer being up close, it really took off.

Cooling down took all day though, and I’m not kidding – even into the night, the foundry was hot! The handle was cool enough to carry it indoors though. That residual heat came in handy for lunch though – I managed to cook an egg on the top of it and even cooked hamburgers in a flash, before our separate barbecue could even get up to temperature.

It looks as though metal melting days will be barbecue days as well! Next step will be to start melting our scrap aluminium and casting into ingots.


Studio Notes: Silicone Moulding & Woodcuts

Studio Notes: silicone moulding and woodcuts

This week in the studio I’ve been bouncing between a couple of projects – making silicone moulds from regular silicone mixed with cornstarch, and starting my woodcut coin print.


Silicone and corn starch moulds

I bought two tubes of silicone and two boxes of cornstarch weeks ago, ready to have a go at making my own silicone moulds. Never mind that I didn’t really have a plan as to what I wanted to cast – I just wanted to see if I could make it work.

It was worth the cost of a few cheap tubes to experiment, but even though I had my materials, I forgot about it for a while. When the summer holidays started, it seemed like a good time to get started on the experiment, if only to get T interested in making. It turns out that he wasn’t too interested in the process, but I was hooked.

To do this, you need acetoxy-cure silicone, also known as Silicone 1. It’s the kind that smells of ammonia, so I did all of my mixing outdoors.

Silicone coin mould
Barbados 1 cent coins pressed into silicone.


My first tries were random, with a bit of everything thrown in. My second attempt was a lot more purposeful, but more on that later. The silicone picks up a tremendous amount of detail though, just look at the impressions my Bajan 1 cent coins made!


Woodcut coin block


Like many of my projects, this one has been a long time in the making, and has used components from some seemingly unrelated experiments.


The block for this was salvaged and used for a series of silhouette drawings – nothing that I ever really intended to see the light of day, really, just to have around the house. Eventually I admitted that I didn’t like it much and that I could give it over to a worthier cause.


Woodcut blocks are romantic enough but dang, they are hard work! In fairness, I don’t have any actual woodcutting tools (not for this kind of work) and I can only find two lino blades, which I blunted in the course of carving the block.


I’ve got plans for this but think I’ll have to get my hands on some oil-based printing ink, as the second pull I made with water-based ink did gum up the block somewhat. I decided to spray it with a sealant, but that took away a bit of the charm of the block’s original colours… still, it had to go sometime.

The block is a means to an end as it’s a part of my money project, but I like thinking about print blocks as works in their own right as well, so I actually made a silicone mould of the block itself, so I can replicate it in case it gets ruined… or just if I want to!


Homemade silicone mould of a woodblock.

Studio Notes Silicone Moulding & Woodcuts

0